
Now that you are familiar with Excel and VBA, you may wish to start exploring Google Sheets and Google Apps Script. When you create a Google account, you have free access to cloud storage on Google Drive, where you can use a free suite of productivity tools to create documents. One of these free tools is Google Sheets, a spreadsheet application. Google Sheets is very similar to Excel. Formulas are created in the same fashion and most of the same functions are supported.
Google Sheets supports a powerful scripting environment called Google Apps Script (GAS). GAS is a variant of JavaScript, the most common scripting language for web pages. GAS is an object-oriented programming language. A complete reference for the classes used in the Spreadsheet service of GAS can be found here:
https://developers.google.com/apps-script/reference/spreadsheet/
Example code is included. You can also google countless sites with sample GAS code and problem solutions.
Here are some differences/comparisons between Google Sheets/GAS and Excel/VBA:
Free - Excel is a commercial product. Google Sheets is free.
Multi-Platform - While the Mac version of Excel supports VBA, it is limited. Google Sheets works on all platforms exactly the same way. All you need is a browser.
Script Security - With Excel, you have to mess with the Macro security settings to get your VBA code to work and you have to save the file as *.xlsm. With Google Sheets you simply give it permission to run once by making a few clicks and that is it.
Sharing - With Google Sheets you can easily share the document with someone else and each of you can edit it, even at the same time. Fantastic for collaborative projects.
Ease of Scripting - Here I would give the edge to Excel/VBA. GAS has a steeper learning curve. But don't let that stop you. Once you get the hang of things you will be turning out code like a champ.
Controls - Google Sheets does NOT support ActiveX controls. You can execute your GAS in one of four ways: a) Using a menu command, b) using a drawing object (you can make it look like a button, c) as a custom function in a formula, d) using the run button in the Script Editor window.
Recording Macros - This is a tie. Both platforms allow you to record actions and turn them into code.
Before diving into Google Sheets and GAS, I recommend you spend some time learning about Javascript. No need to buy a textbook, there are tons of free resources on the web. I recommend the following site:
Click on the JavaScript link on the left.
If you have an Excel file you want to try in Google Sheets, just upload it to your Google Drive and then right-click on it and select Open With|Sheets. It will create a copy of the file in Google Sheets format and open it. Your VBA code will not be preserved, but almost everything else will be.
You can also create a new blank sheet. In Google Drive, click on the New button and then select Google Sheets.
Once you open your sheet, you can access the editor by selecting the Tools|Script Editor... command. This takes you to the editor with a new project, a new code file (Code.gs), and an empty function:
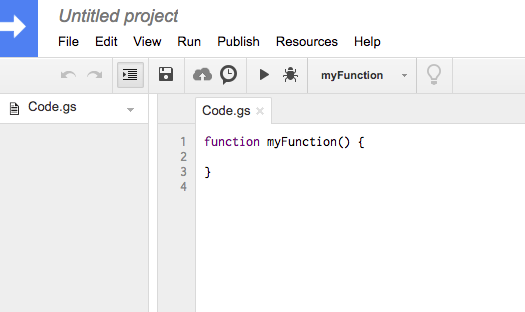
Lets change the function code so that it multiplies the input by 2:
function double_it(x) {
return x*2;
}
Save the changes and then go to the sheet and try the formula:
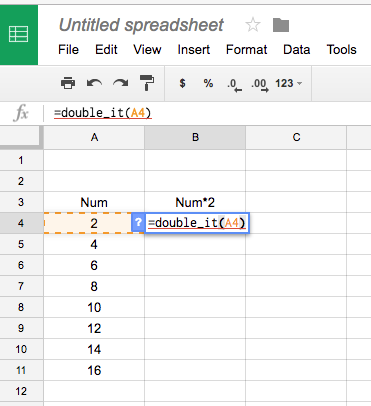
It's that easy!

Let's write a function that prints "hello world". In Excel VBA, we would write a custom sub. In GAS, we write a function with no parameters and it behaves like a sub. Add the following:
function hello_world() {
var ss = SpreadsheetApp.getActiveSpreadsheet();
var sheet = ss.getSheetByName("Sheet1");
sheet.getRange("C3:D11").setValue("hello world");
}
To run the code, change the function selector in the toolbar to the editor to "hello_world". This sets the active function.

Then click on the Play button. The first time you do this you will need to give permission for the script to run. When it finishes, you should see this:

Next, let's record a macro. This process is almost identical to Excel. We will record a simple macro that formats the range of "hello world" cells. First, select the Macros|Record macro command in the Tools menu.

This puts you into record mode. You should see this window at the bottom of your screen:

Next, apply some formatting as follows:
1) Select all of the cells that contain "hello world"
2) Change the font to italic
3) Change the cell alignment to center the text
4) Apply borders to the selected cells
5) Fill the selected cells with a color
You don't have to follow those steps exactly. Feel free to apply whatever formatting you want. When you are done it will look something like this:

When you are done, select the Save command in the macro window at the bottom of your browser. That will bring up the save dialog. Enter "my_macro" and select Save.

Now we are ready to try our macro out. Before doing so, select the undo button (repeatedly if necessary) to remove the formatting.

To run the macro, select the Macros|my_macro command.

Boom! Your table should be reformatted.
To view the code, go back to the Code Editor and click on the macros.gs item on the left. Your macro code will appear. As is the case with Excel, you can now modify this code, copy-paste it to a different module, etc.

OK, now you have enough to get started. Have fun!
Click here to get a copy of the sheet used in this page.