The following instructions describe how to set up a website on the CAEDM J: drive using Nvu.
Nvu is a free web page authoring utility. You can download a copy for your personal use from the official NVU site or you can grab a copy from our local server. When you download Nvu it will place a zip archive on your local drive. Simply unzip this archive and go inside the resulting folder to find the Nvu.exe file and double-click to launch Nvu. There is no install utility and it does not make changes to the registry, so you can install it anywhere, including the J: drive or on a local flash drive.
Note: This tool only works for Windows. It is not supported by the latest Mac OS Mojave
Before starting, let's review how webpages are hosted on the CAEDM system. When you logon to your CAEDM account you may have noticed that you have a subdirectory on the J:\ drive labelled "www". Everything you put in this directory will be visible on the internet using a web browser. This is done using an aliasing system handled by the CAEDM web server. For example, suppose that I create a web page in the J:\www folder called "mypage.htm". When I edit this folder while logged on to CAEDM, I edit it directly on:
J:\www\mypage.htm
To view this page using a web browser, I simply type in the following URL:
http://www.et.byu.edu/~username/mypage.htm
where username is my CAEDM user name. For example, if my CAEDM user name is njones, the URL becomes:
http://www.et.byu.edu/~njones/mypage.htm
Note that the "~" character is on the upper left corner of your keyboard.
Recall that each website typically has a default home page named "index.htm" or "index.html". If this file is present in the directory for your website, you can omit the name of the file in your URL. For example, the following two URL's both point to the same web page:
http://www.et.byu.edu/~username/index.htm
http://www.et.byu.edu/~username/
Thus, you can shorten the URL for your website by using "index.htm" as the name for your main web page (i.e., your home page).
Many websites involve multiple web pages. If you want to organize your web pages into subdirectories, that is not a problem. Simply create subdirectories inside your www directory and give them descriptive names. Each subpage can have its own default page (index.htm) if you wish. For example, suppose I have a subdirectory called "hobbies" that contains the following files:
index.htm
fishing.htm
skiing.htm
canyoneering.htm
The following URL would point to each of these pages:
http://www.et.byu.edu/~username/hobbies/ (for the index.htm page)
http://www.et.byu.edu/~username/hobbies/fishing.htm
http://www.et.byu.edu/~username/hobbies/skiing.htm
http://www.et.byu.edu/~username/hobbies/canyoneering.htm
To create a website on your J:\ drive using Nvu, do the following:
At this point, you should see the Nvu window with an empty untitled document:
![]()
First we will create a new "site". A site is a collection of web pages at a common location. Defining a site allows you to manage all of the web pages associated with the site as a single group.
At this point, your settings should look something like this (I am using a subdirectory called "demo"):
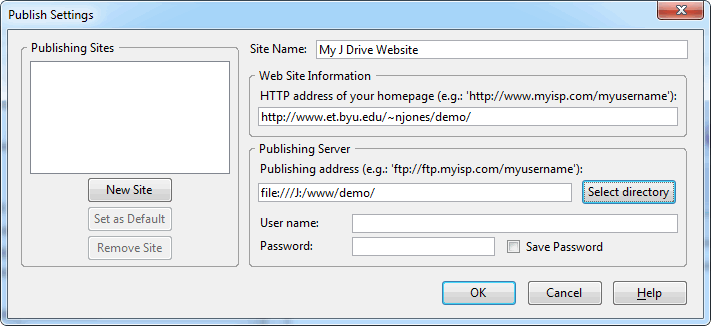
The Publishing Server settings shown above are only valid if you are working on a computer in one of the CAEDM labs. If you work from home or off-campus from a laptop or a PC, you will want to set up the Publishing Server settings a little differently. If you are working on a web that is stored on the J: drive, you will not be able to use the Publish option in NVU to upload your files because CAEDM uses a secure FTP method that is not supported by the college. However, you could easily use FileZilla or some other FTP client to upload your files to the J: drive.
If you are using a different web hosting service to host your web files, you can use the Publish option in NVU to upload a local copy of your files to the remote server. Your settings will look something like this:
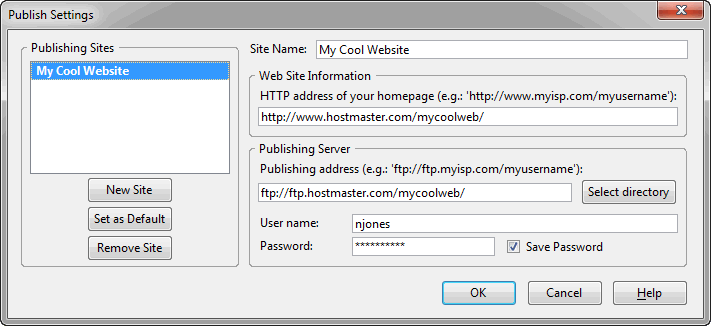
You would need to check with your web hosting service to get the precise details on the publishing server log in.
Now you are ready to make your first web page. Note that you have a blank page open called "untitled". Let's edit this page and make it our home page.
Let's test our new web. Bring up a web browser and type in the URL of your web. As described above, this will be something like:
http://www.et.byu.edu/~yourusername/
Be sure to add the name of the subdirectory if appropriate.
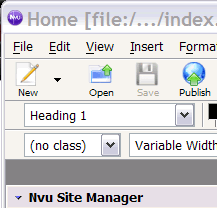
Let's review some basic editing options. First of all, let's assign a style to the heading (controls the font size, etc.).
Your heading now should appear larger and in bold. We will now enter some lines of text.
Generally, we want our main text to correspond to the Paragraph style, not Body text.
Note that the new line is automatically defaulted to Paragraph style. You should also note that paragraphs are all separated by one blank line.
At this point, your page should look something like this:
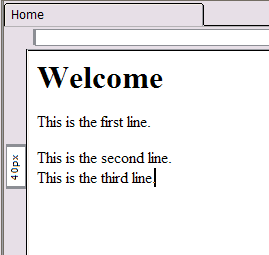
Note that last line did not have a separator. That is because Shift-Enter creates a line break within an existing paragraph. This is a simple and quick way to control the line spacing.
The underlying code for web pages is HTML (hypertext markup language). We are currently viewing the web page in WYSIWYG (what you see is what you get) mode. To view in the native HTML format:
Your source should look something like this:
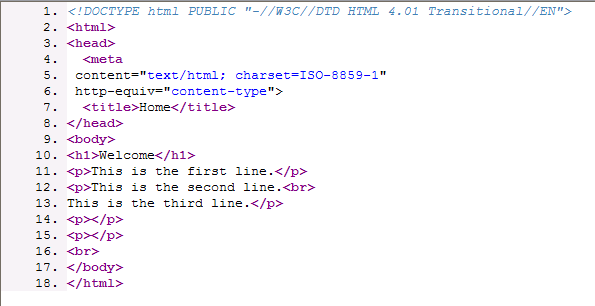
Each of the items is wrapped in a pair of "tags". For example, the heading is enclosed in <h1></h1> tags. Each paragraph is enclosed in <p></p> tags. Some tags do not come in pairs. For example, the <br> tag marks a line break within a paragraph. Tags can also be nested. Everything is nested within the <html></html> tags. The main body of the page is nested within the <body></body> tags. You can next formatting tags within paragraph tags. For example <b></b> tag is used to make something bold.
To view our changes:
You can also adjust the formatting on selected text using the formatting tools at the top of the window.
![]()
Most web pages utilize images or graphics in addition to text. Since HTML is simply a text format, images must be stored separately from the text. So inserting an image is a two step process:
Step 1: Save a copy of the image to a folder on your website in either JPG or GIF format.
Step 2: Insert a link to the image from your HTML source.
To illustrate the process, let's find and image and put it in our web page.
This completes step 1. Now we need to create a link to the image in our web page.
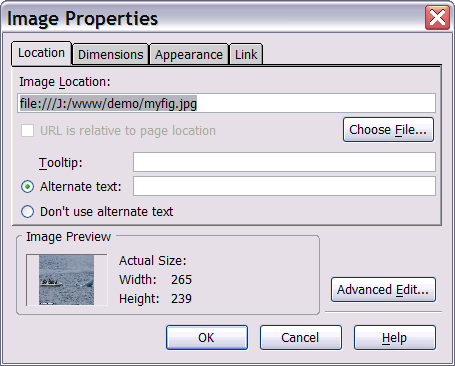
At this point, the dialog should look something like this:
Note that the entire path of the file is listed. I am not sure why Nvu does it this way, but it won't work. The J:\ drive link is only valid when you are logged onto CAEDM; it won't work when we use a browser to view our web page. To fix this:
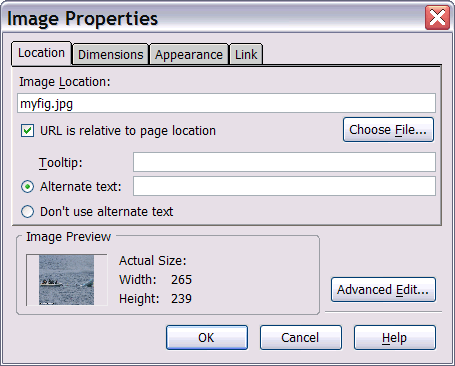
Now the dialog should look like this:
Finally:
Your image should appear at this point. You may want to switch to Source mode to see the HTML code associated with your image.
Next we will create a hyperlink to another website. Each hyperlink consists of two parts: 1) the text that is displayed and 2) the underlying URL of the webpage associated with the hyperlink. We will create a hyperlink to the ESPN website.
The color of the link should change. To test your link:
Tables are a great way to organize information in your web page. They can be used with borders to present a traditional table of information in rows and columns or they can be used without borders as a simple way to arrange information (images, links, etc.) on your web page. To insert a table:
A small table should appear in your web page. Position the cursor in each cell and type some text. Note that you can insert images or any other web content in the table of your cell. To edit the table:
You can also edit a table by viewing the source and editing the tr (rows) and td (column/cell) tags.
To add new pages to your web, just create additional pages the same way you created the index.htm page, but use a different name. Save the pages to the same folder. You can create links to these pages from your main page using the Link tool and typing in the name of the page (as was the case with the image, don't use the full path).