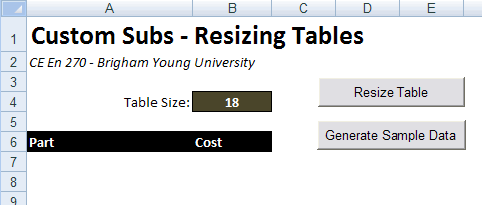
Excel spreadsheets are a perfect tool for working with tables of information. However, in many cases, you don't know beforehand how big the table should be. One solution to this problem is to use VB to resize your tables. For this assignment, you will be creating a spreadsheet that looks something like this:

The table lists a set of parts where each part has a cost. There is a formula at the bottom of the spreadsheet to sum the total cost and also to report the total number of parts in the list. The Resize Table button deletes all information on the table and generates a new table with a number of rows equal to the specified table size. It also completely reformats the table area and enters the two equations at the bottom in the correct location and with the correct formatting. The Generate Sample Data button inserts several rows of sample data into the table in order to test the formatting and equations.
Click here to download a copy of the spreadsheet shown above. The spreadsheet you download will look like this:

Complete the following steps in order to set up the spreadsheet:
1. Record a macro that enters six or seven rows of sample data into your table (assuming your table is at least this big). Modify the VB code for the Generate Sample Data button so that it calls this sub. You will be able to use this button to test your Resize Table sub. Please note that if you run this when the table has fewer rows than your sample data, your data may go beyond the end of the table. That is OK since this button is for testing your formulas only. Just be sure to use it only when your table size is sufficently large.
2. Record a macro that sets up the formatting of the data section of the table (including borders, colors, currency style, etc.) and the entry of the labels, formatting, and formulas for the summary section at the bottom (use the Count function to get the number of parts). When you enter the formulas, be sure to use an absolute reference to the row at the top of the table and a relative reference for the row at the bottom. This will ensure that the formatting will be correctly applied when you make the macro more general in the next step.
3. Modify the code for the macro (sub) you recorded in step 2 so that it accepts a single integer argument and reformats the table according to the size (number of rows) indicated. Add VB code to the Resize Table button that reads the table size from cell B4 and passes it to your modified macro sub. When you do this, you will need to modify the parts of the recorded VB code that selects a range of cells. To do this, you may want to use the following method:
Range(Cells(r1, c1), Cells(r2, c2)).Select
where r1, c1 and r2, c2 refer to the cells at the corner of the range you want to modify (r=row and c=column so cells(3,1) would be the same as Range("A3") which is helpful because it allows you to use variables in place of numbers if necessary). The trick is to specify the correct values based on the size of range you want to modify.
Also, as you modify the code for the recorded macro, you may need to change some formulas that use R1C1 notion. As you do so, you may wish to review the R1C1 section of the VBA Primer.
1. Be sure to save the changes to your spreadsheet.
2. Upload your spreadsheet via Learning Suite.