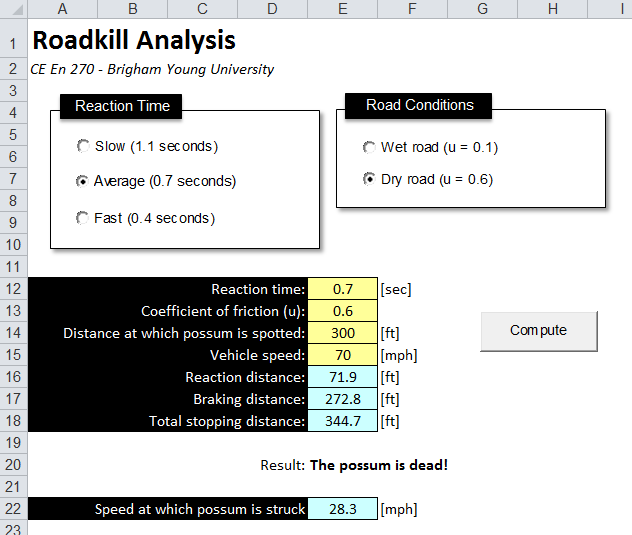
Design and write a "Roadkill" spreadsheet using VB code. You can organize/layout the spreadsheet any way you wish, but your spreadsheet may look something like this:
In this scenario, the user is driving down a road and specifies the constant speed at which he/she is traveling. At some point the driver spots a possum crossing the road in front of the car. The possum freezes in its tracks and the user slams on the brakes. The spreadsheet should let the user know if he/she will be able to stop in time. (**Note: do not forget to convert mph to ftps and vice versa for your computations**). The blue cells are what you will be filling in with your code, the example above helps you know if you did it correctly.
1. The spreadsheet should allow the user to specify the speed of the car [mph], the distance [ft] at which the opossum is spotted, the road conditions (for wet road, u = 0.1, for dry road u = 0.6), and the driver's reaction time (fast = 0.4 seconds, average = 0.7 seconds, slow = 1.1 seconds). (Make sure you are consistent with your units!).
Your spreadsheet should include two option groups as shown above. Be sure to use a unique group name for each set of option controls. When the user clicks on one of the option controls, you should update the value in the appropriate cell (reaction time or friction coefficient).
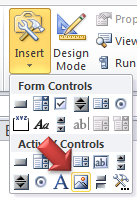
2. Create a compute button (appropriately named, using ActiveX controls) where all of your code will go. (It will be helpful to read through all of the instructions first)
vf = final velocity (velocity on impact), vi = speed prior to braking, a = deceleration, d = actual braking distance (i.e., distance at which possum is spotted minus the reaction distance), and x = braking distance.
It takes the average driver about 0.7 seconds to apply the brakes after seeing the need to stop; this is called the driver's reaction time. Once the brakes are applied, the car decelerates.
The deceleration is given by:
a = -ug
Where g is the acceleration due to gravity (32.2 ft/s2) and u is the coefficient of friction between the car's tires and the road.
Assuming a constant deceleration a, the braking distance x is given by:
x = -v2/(2a)
The total stopping distance is the sum of the distance traveled during the reaction time (reaction distance) and the braking distance (x). If the total stopping distance is less than the distance at which the possum is spotted, then the driver has successfuly avoided stopping before the possom and their final speed should be 0 mph. If the total stopping distance exceeds the distance at which the possum is spotted, the possum becomes roadkill. In that case, you will compute the speed at which the possum is struck using this formula:
vf2 - vi2 = 2ad
You will need to solve this equation for vf (manually).
For this assignment, you will need to use the VB If statement based on the total stopping distance and the distance spotted (your other information should already have been calculated in above code and input into the table). The syntax of the If statement is as follows:
If (condition) Then
<code that is executed if the condition is true>
Else
<code that is executed if the condition is false>
End If
For example
If stopdistance < sightdistance Then
Range("E20") = "The possum is safe."
Range("E22") = 0
Else
Range("E20") = "The possum is dead!"
<put your code here to calculate vf>
Range("E22") = vf
End If
We will learn more about the If statement later in the semester.
Your calculations should be done in VB code. When the user clicks on the Compute button, you should copy the values of the four input cells to a set of variables with the type "double", perform the calculations, and put the results in the four cells shown in blue plus a text description of the outcome as shown above.
While this is NOT required, it is fun to associate some graphics with your results. For example, you can have an image of a dead possum appear in one case and have an image of a live possum appear in the other case. This is actually quite easy to do. First of all, you will need to locate and download two images to your local drive. Then, create two image controls on your spreadsheet:
Drag a rectangle somewhere on the sheet for each of the two controls. Give them descriptive names (imgLive and imgDead for example). With one of the controls selected, look in the Control Properties window and you will see a Picture property. Select the control and you will see a little button the right labelled "...". Click on this button and select the appropriate file from the two that you downloaded. This will link the image to the control. Repeat for the other control.
To turn the controls on and off, you simply need to modify the Visible property of the controls. It is a Boolean field so you just toggle it between True and False. You could simply modify the If statement shown above as follows:
If stopdistance < distance1 Then
Range(E20) = "The possum is safe."
Range(E22) = 0
imgDead.Visible = False
imgLive.Visible = True
Else
Range(E20) = "The possum is dead!"
<put your code here to calculate vf>
Range(E22) = vf
imgDead.Visible = True
imgLive.Visible = False
End If
Note how you turn one image off and the other one on in each case. After you get it working, you can reposition your image controls so that they are in the same location if you wish.
1. Be sure to save the changes to your spreadsheet.
2. Upload your spreadsheet via Learning Suite.